|
|
| |
Paint Shop Pro Scans Tutorial.
In this tutorial I have tried to really go into a lot of detail, so if it appears very basic don't take it as an insult to your intelligence! Also, in some factors I havent been too specific, you'll have to play about with it yourself to find the best results. Good luck.
|
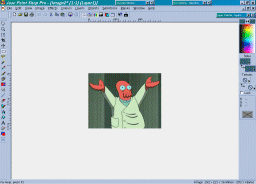
1. Find a framegrab (picture or frame from an episode) containing the character or object or even scene you want to make a picture (scan) of. I suggest using one of the link buttons on the left to find framegrabs, especially CGEF. Anyway, open the framegrab in a good graphics program (I use Paint Shop Pro 7) and cut and paste the selected area you want to "scan". I know this is a Fry site, but I'm using a picture of Zoidberg here, as he is extremely cool
|
|
2. Firstly, resize the image. For the best results I suggest resizing it so it's quite large, I suggest you make sure the average pixel size of the enlarged image's height and width is roughly 1100. However, you can mess about with this yourself, experiment to see what gives you the best results.
|
|
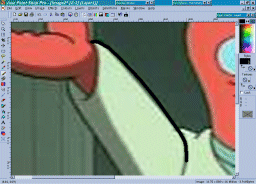
3.Before you do anything else, make a new layer!!! This is extremely important, make sure you do it. Stay on this new layer unless I explain otherwise. Right, now it helps to zoom in a bit, but again that's up to your personal preference. Select the paintbrush tool, and set the brush width to "7." Now, carefully start tracing around the outlines of what you want to "scan-art". I do this by clicking on a point with the brush, holding down shift, then click along a line at intervals. If you don't understand what I just said then, just trace around the image as though you are, well, tracing it!
|
|
4.If there is any "shading" in the picture don't use a black line to mark it, out, because it will just look... wrong. Using the dropper tool, select the colour of the shading from the original layer (don't change layer to do this however). Next, with this colour, trace around the area of shading.
|
|
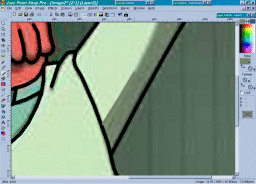
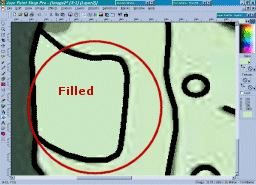
5. When you have traced all the lines you need you can start colouring. Select the "magic wand" tool. Click on a section of your drawing and provided there are no unwanted gaps in the image and you are on the right layer then the section you want should be highlighted by "marching ants." If everything's OK so far then select the dropper tool and select the colour you need from the original layer. Next, using the filler tool, click in the area you had just selected earlier and, voila, its filled with that colour. Repeat that step for all sections.
|
|
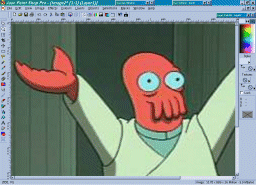
6.You can now finish the picture off. Resize the image, to roughly 30%, but again play about for the best results. Now delete the original layer with the first picture on, so you're just left with your scan. Save the pic, best if saved as a ".gif", and BAM, you're done. To look at some scans we've made, go to the Scans section.
|
| |
|
|
|
|
|
|
|
[an error occurred while processing this directive]
|
|
|
|
|
|
|
|
|
| Fry: 'Take that one, and that one. This sentence I don’t understand, but take this one.' |
|
|
|
|
|
|
|
|
|

Ain't no such thing as too much Amy Wong
The definitive Amy Wong fansite, featuring original content, as well as an original layout. Also has a sub-site on the Planet Expresss ship. |
|
|
|
|
|
|
|
|